The V3 Adapter is an adapter specifically designed for using both Wii and USB controllers with games like Guitar Hero, Rock Band, Clone Hero, Yarg, Fortnite Festival and more!
Guitar Hero World Tour
Guitar Hero 5
Band Hero
Guitar Hero Warriors of Rock
DJ Hero Turntable
DJ Hero
DJ Hero 2
Note: Third party guitars may or may not work. We cannot guarantee support, so we highly suggest purchasing a first party guitar. If you need help figuring out if the one you’re planning on getting is a first party guitar, feel free to send us an email!
To change the preset of your V3 Adapter, you must use the RCM Programming Tool. Click here to be taken to the download page.
1
Open the RCM Programming Tool.
2
Plug your V3 Adapter into your computer. You will see it appear with “Configure” and “Reset to factory” buttons.
3
Click “Configure“
4
You will be brought to this screen in the Programming Tool
If you are attempting to change to a different preset, click the dropdown on the left side, then select that preset. After, click “Save Settings“.
5
Wait until the bar at the bottom reaches 100% and says Status: Done.
6
Final notes: You may need to adjust the hit sensitivity of your instrument. The following section breaks down each type of instrument and how to install the V3 into them.
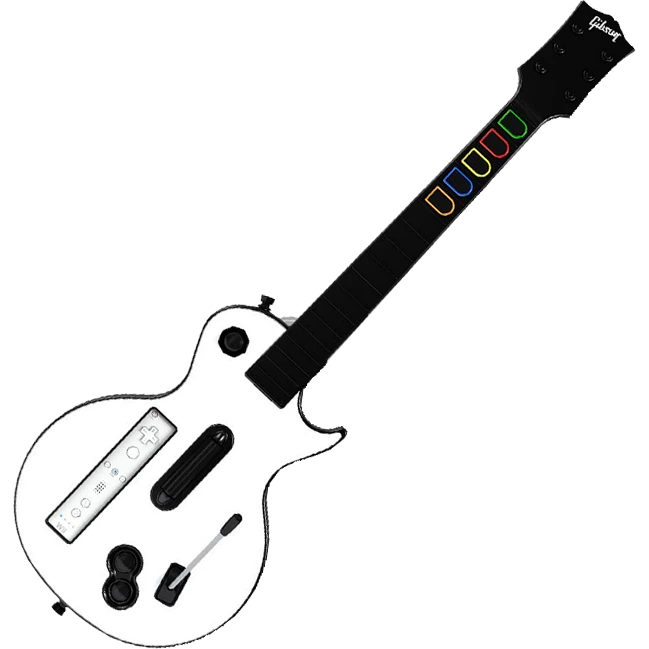
Plug in the cable coming out of the guitar into the V3 Adapter. (white cable below) This can only go in one way. Plug in a USB-C cable into the V3 Adapter, making sure to plug the USB-C end into the adapter and not the USB-A port. (black cable below)
2
Fit the V3 Adapter into your guitar, there may be little silicone pads in the remote slot that will allow your adapter to fit snug.
"Righty"
Fretting with your left hand, strumming with your right hand.
"Lefty"
Fretting with your right hand, strumming with your left hand.
3
Plug the other end of the USB cable into your platform of choice.
4
You may need to calibrate your whammy bar, which is addressed in the next section.
Plug in a USB-C cable into the V3 Adapter. The smaller USB-C end will go into the V3 Adapter, while the USB-A end will go into your PC to continue the setup process.
4
Move onto the Turntable Tuning guide in the next section.
***You will ONLY need to do this with USB guitars. Wiimote Nunchuk connected guitars rely on the V3’s internal tilt sensors.
Click here for a step-by-step Tilt Tuning guide.
1
First, we must open the USB Host Inputs dropdown menu in the RCM Programing Tool.
2
Scroll down to the guitar tilt section and click the empty space or the dropdown arrow. This menu will appear:
3
Click Calibrate!
4
Then, position your guitar in the position you play in. Click Next.
5
After that, tilt your guitar up to the position you would like tilt to activate. Hold it there and click next.
6
Once you’re satisfied with calibration, click “Save Settings” on the left side of the window. Once the programming tool has finished writing the firmware, it will show “Status: Done” and 100%. Close the software.
Whammy Calibration/Tuning
1
First, we must open the Wii Extensions Inputs or USB Host Inputs dropdown menu.
2
Scroll down to the guitar whammy section. You’ll see this:
3
Click Calibrate!
4
Then, don’t touch your whammy bar and then click Next.
5
After that, push your whammy bar down as far as it can go without overdoing it. Hold it there, then click Next.
6
Now you have to set Deadzone. Push the whammy bar in a little bit and you can see the value go up a little bit. Look for a point where the whammy won’t activate on it’s own. Hold it there, then click Next.
7
You’re done! Click Save Settings on the left side and wait for the status bar at the bottom of the window to reach 100%.
After it’s done, give it a try! You can manually adjust the deadzone with the sliders as well if you’d like to tweak your settings.
Drum Tuning
1
Before even attempting to calibrate the V3 Adapter for Drums, make sure you’re on the preset for your controller. Click here to be taken to the programming section. You can find out what preset you’re on in the main menu of the programming tool.
2
Plug in your controller or electronic drum kit.
If you are using USB-MIDI, you should see “1 Devices connected” next to USB Host Inputs.
3
Click the MIDI Inputs dropdown, then start tapping on your drums while looking through the inputs to find if they are appearing. It may be useful to write down the MIDI note value for each of your pads/cymbals for easy future reference.
4
Refer to the picture above. Value shows the signal sent from your drums to the ACE Adapter. Hit the pads to see the bar move and number go up! There are two modifiers you can change, Threshold and Sensitivity.
Threshold is how hard you have to hit before the game detects an input. Raising this requires you to hit harder. You want to change this if your light hit starts at a high number.
Sensitivity defines the max range of detection. It determines the loudness or hardness of the hit that the game detects. Lowering this allows hits with less strength to hit louder. You want to change this if your hard hits do not get close to maxing out the Value meter.
5
Some pads are more sensitive than others, so we suggest going through each pad/cymbal/input and adjusting to your liking.
6
Once you’re satisfied with calibration, click “Save Settings” on the left side of the window. Once the programming tool has finished writing the firmware, it will show “Status: Done” and 100%. Close the software.
7
Load up your favorite game and play! Or plug into your console and play!
Before even attempting to calibrate the V3 Adapter for Turntables, make sure you’re on the preset for your controller. Click here to be taken to the programming section. You can find out what preset you’re on in the main menu of the programming tool.
2
Now that you’ve installed the adapter into your turntable and plugged it back into your computer, you must calibrate the device.
If you are using a Wii turntable, click on the “Wii Extension Inputs” dropdown and configure from there.
If you are using a Playstation or Xbox turntable, click on the “Usb Host Inputs” dropdown and configure from there.
3
You will have to calibrate the Fade and Effects knob, as well as the turntable multiplier You may have to adjust the settings a few times to figure out what works best for you.
4
Once you’re satisfied with calibration, click “Save Settings” on the left side of the window. Once the programming tool has finished writing the firmware, it will show “Status: Done” and 100%. Close the software.
Gamepad Thumbstick Tuning
1
Before even attempting to calibrate the V3 Adapter for Gamepads, make sure you’re on the preset for your controller. Click here to be taken to the programming section. You can find out what preset you’re on in the main menu of the programming tool.
2
Plug in your gamepad. You should see “1 Devices connected” appear next to either USB Host Inputs or Wii Extension Input, depending on what type of gamepad you plugged in.
3
Click the dropdown with whichever type of input you plugged in, then scroll to the thumbsticks. There should only be four inputs. X and Y axis for both thumbsticks.
If you are using a Wii Classic Controller, you will see this instead:
4
Move both stick around and see the values that they idle at once you release. Adjust the deadzone to be a bit higher than the idling number. Once you set this, click Save Settings on the left side of the window. You can also use the Calibrate feature, which you then just need to follow the steps of.
Optionally, you can set deadzones for triggers if those are experiencing any erratic change in idle value.
5
Once you’re satisfied with calibration, click “Save Settings” on the left side of the window. Once the programming tool has finished writing the firmware, it will show “Status: Done” and 100%. Close the software.
To play Rock Band 4 on your Xbox with a V3 Adapter, you will have to authenticate the device with a licensed Xbox One or Xbox Series controller.
1
Turn on the Xbox One/Series, then using your Xbox controller, load into Rock Band 4.
2
Disconnect the Xbox controller from your Xbox One/Series. (Pop out batteries)
3
Connect the licensed Xbox controller into the female USB-A port on the V3 Adapter.If one model doesn’t work, try another. Sometimes these things just don’t like to authenticate and you have to try another model. (Sometimes even third party ones work)
Xbox One – models 1537, 1697, and 1698
Xbox One S – models 1708 and 1797
Xbox Series S/X – model 1914
4
Plug the adapter into the console with the gamepad plugged in.
5
Wait a moment, then press start on the gamepad to verify the connection is made. On the “Join” screen, a guitar player should appear.
6
Unplug the licensed Xbox controller from your device.
7
Plug in your guitar, if applicable.
8
Play the game!
If your controller is connected under the profile you want to use for the guitar, you’ll need to “drop out” the controller before assigning that profile to the guitar.(image)
PC, Playstation 4/5, Xbox One/Series - GUITAR KEYBOARD MODE
NOTE: EPIC HAS CHANGED A SETTING IN FORTNITE THAT HIDES PRO MODES NORMALLY. YOU WILL WANT TO ADJUST THIS TO ALWAYS HAVE PRO MODES SHOWING. TO FIX THIS:GO TO Settings > GAME > scroll to bottom > change “Always Display Pro Parts” to ON.
Hold the GREEN fret while plugging the V3 Adapter into your console/PC. If you are using a wireless controller like the Riffmaster, plug a gamepad into the V3 Adapter first, then hold START while plugging the V3 into your console/PC. Then, unplug the gamepad without unplugging the V3 Adapter, then plug the Riffmaster dongle into the V3 Adapter.
This will put your guitar into keyboard mode, where your inputs will be assigned to the default Fortnite Festival Pro Lead Keyboard settings:
1-5 for frets
Right Ctrl & Right Shift for strum
Forward Slash (/) for whammy
Page Down for overdrive
You will know it’s working if your instrument changes when you press the frets in the Festival Main Stage Lobby.Note that you will have to control your menus/character movement with keyboard & mouse/other controller, but once you load into the game from the Festival Main Stage, the guitar will function as intended! Have fun!
PC, Playstation 4/5, Xbox One/Series - PRO DRUMS KEYBOARD MODE
1
Download the latest RCM Programming Tool. Make sure it’s at least version 10.7.9 or newer.
2
Open the RCM Programming Tool
3
Plug the adapter into your computer
4
Click reset to factory
5
Set the device variant to V3 Adapter then preset to RB Drums. This still applies even if you are using a Guitar Hero drum kit.
6
Click “Erase and Configure”
7
Once it is done programming, click Configure
8
(OPTIONAL STEP) Plug your drum kit into the V3 Adapter, then open the MIDI Inputs dropdown menu. Then start hitting the drums. Check and make sure each pad has an input.
9
Once you’ve determined all the inputs are working, unplug the V3 Adapter from your computer. Let’s move over to the console now.
10
NOTE: EPIC HAS CHANGED A SETTING IN FORTNITE THAT HIDES PRO MODES NORMALLY. YOU WILL WANT TO ADJUST THIS TO ALWAYS HAVE PRO MODES SHOWING.Open Fortnite, navigate to the “GAME” tab in the settings menu (it should have a gear and controller symbol)
11
Turn on “Always Display Pro Parts”If you want to enable cymbals, scroll further down and turn on each cymbal setting.
12
While holding START on the drum kit, plug in the V3 Adapter into your console with your drum kit already attached. If you don’t have a start button, plug in a gamepad into the USB-A port instead of the drum kit, then plug the V3 Adapter into your console while holding the start button on the gamepad. This is to set it into keyboard mode. After, unplug the gamepad (and not the V3) if you needed to use one, then replug in the drum kit.
13
Since you’ll be using keyboard mode you’ll have to navigate with a gamepad. Select Pro Drums in the Fortnite Festival Main Stage. You’ll know if it’s working if your kick pedal makes you jump.
14
Play!
Nintendo Switch - GUITAR
NOTE: You will have to switch between two modes while navigating and playing, so be ready to do that often.MODE SWITCH BUTTON COMBO:
(press and hold yellow first, then tap start once)
1
You want your V3 Adapter to be on the Default preset. If you have changed yours to be something different, please download the latest RCM Programming Tool and factory reset it back to Default. You will have to calibrate your whammy (and tilt if needed).
2
Turn on your Nintendo Switch and plug your adapter/guitar in! It should be able to navigate the NS menu immediately. If not, unplug and replug in the adapter/guitar.
3
Once you have confirmed that your adapter/guitar is working on the Switch, open Fortnite Festival.
4
Once the game is open, you should be able to navigate the game with the guitar, at least somewhat.
5
Open your game settings, then switch to the GAME tab. Scroll to the bottom and switch the “ALWAYS DISPLAY PRO PARTS” to ON.
6
Load into Fortnite Festival Main Stage, then select your songs. Once you ready up, HOLD YELLOW then tap START. Your guitar should then function to for play!
7
After your song is over, do the YELLOW+START combo again to be able to navigate.
Setup on Windows is usually easy as plug-and-play, but sometimes things have to be mapped manually.
Clone Hero
1
Open Clone Hero.
2
Press the SPACE BAR on your keyboard to open the controls/binds menu.
3
If you haven’t already, plug in your V3 Adapter with instrument attached. You will see the V3 Adapter appear here:
4
If you are playing on with a guitar, you may need to calibrate tilt and/or whammy. Click the Calibrate button.
You will be taken to this menu:
Axis 0 tends to pertain to whammy while Axis 1 is usually for tilt. Click Calibrate and follow the directions. Once you’ve calibrate, click Done.
5
On the right side of the main binds menu, there are blank spaces for each input. Click on the inputs that apply to your instrument and follow the setup instructions. Once you’ve bound all applicable inputs, click Done at the top left of the screen.
6
Once binds are set, press start in the home screen to pick your profile, then jump into a song and test out your inputs!
7
YARG
1
Plug in your V3 Adapter + instrument
2
Open the YARC Launcher, then open YARG
3
Once the game is open, head to the Profiles section
4
Create a new profile if you don’t already have one, then click “Connect” on that newly made profile. It will ask you to pick a device.
5
If you are using an instrument aside from a guitar, change the “Game Mode”
6
Click the Edit Profile and Binds button, then click on the Binds button at the top of the screen.
7
Go through each applicable input and create a new bind for each one, setting up the buttons as you go! Some instruments might not need this, so do as needed.
8
Once you have the binds set up, you’re ready to play!
Inputs should be bound automatically when using the GH Guitar preset (default).If not, try plugging the adapter in BEFORE you open the game.If that does not work, update your BetterGH3 to the latest revision.
Dolphin
1
Open Dolphin
2
Click the Controllers button in the tool bar
3
In the “Wii Remotes” section, click the Configure button next to Wii Remote 1
4
At the top left of the window that popped up, change the device to the V3 Adapter
5
Then, on the right side of the window, there is an Extensions section. By default it will show that there is “None” extension. Change that to Guitar, then click Configure Extension. You will be taken to the Extension menu.
6
In the Extension menu, begin mapping each input. If you have trouble mapping them from the Extensions menu, right click the input. A popup will appear that shows all possible inputs. Press down the input you’re trying to bind a few times while looking through the inputs. Once you’ve found the one you want, click Insert Input, then click OK.
7
Once you’ve bound all the inputs you need, click Close and test a game!If you run into any input issues, check that multiple buttons are not bound to the same input.
Open PCSX2 and click Tools > Click “Open Data Directory“
This will open a file explorer window of your PCSX2 Installation folder.
2
Drag the PCSX2 Controller Preset file into into the “inputprofiles” folder.
3
Once the preset file is in the ‘inputprofiles’ folder, close PCSX2 and reopen it. Navigate to Settings> Controllers. On the bottom left, click the dropdown menu next to “Editing Profile:” and change it to “RCM_PCSX2_Profile“
4
Click on “Controller Port 1 – Guitar” in the left menu. This screen will appear. If it does not look like this, double check to make sure that the Editing Profile is set to “RCM_PCSX2_Profile”.
5
Close the window and test the inputs in a game!If it does not work, make sure no other controllers are plugged into your computer.
If it still doesn’t work, see the following section.
If the preset doesn't work for you, you can manually bind inputs. Click here to learn how
1
Open the Settings>Controllers menu.You will see multiple input types, including SDL, XInput, and DInput(image)
2
Uncheck SDL, and check XInput
3
Observe the Detected Devices section on the right side of the window. If you haven’t plugged your V3 Adapter in yet, do so. It should appear in that list. Click on it.
4
Navigate to Controller Port 1 on the left side of the window.If you do not see a guitar there already, change the controller type from Dualshock 2 (or whatever it may currently be) to Guitar.
5
Hold SHIFT, then click each input, then add your designated input bind.Once you have them all inputted, close the window and test them in a game!
PCSX2 (RB DRUMS)
1
Open the Settings>Controllers menu.You will see multiple input types, including SDL, XInput, and DInput
2
Make sure that SDL Raw Input is checked. Uncheck XInput if it is already checked off.
3
Observe the Detected Devices section on the right side of the window. If you haven’t plugged your V3 Adapter in yet, do so. It should appear in that list. Click on it.
4
Navigate to “USB Port 1” on the left side of the window.It will show “Not Connected” by default. Change that to Rock Band Drum Kit.
5
Hold SHIFT, then click each input, then add your designated input bind.Once you have them all inputted, close the window and test them in a game!
RPCS3 (GUITAR)
You can use our premade RPCS3 Controller Preset file for an easy setup.
You must first navigate to where RPCS3 is installed. This can be done two ways.
This can be done by either searching for the folder yourself or by right clicking an installed game, hover “Open Folder”, then click “Open Custom Config Folder”.
This will open up a window that contains your game configurations.
Click the “config” folder.
Open the “input_configs” folder. If this folder doesn’t exist, create it.
Open the “global” folder. If this folder doesn’t exist, create it.
Lastly, drag the “RCM RPCS3.yml” file into the global folder.
You can now close out of the File Explorer window.
2
Returning to RPCS3, click on the “Pads” button at the top. This will open the controller configuration menu.
3
At the top right of the menu, click on the Configuration Files dropdown menu and switch it to “RCM RPCS3 Profile”.
4
At the top middle of the menu, your device should have changed to “XInput Pad #1”. If it shows “(disconnected)” beside it, unplug and plug the guitar back in. Then, click the dropdown and see if there is a device without the disconnected tag. If you don’t see XInput Pads at all, change the handler in the top left to XInput. If you need further support with this part, let us know.
5
You can verify that everything is set correctly by comparing to this image.
Your XInput Pad #1 is selected
Your Configuration Preset is set to “RCM RPCS3 Profile”
Triangle is set to X
Square is set to Y
Device Class is set to Guitar
6
Hit Save. This window will pop up. Hit Yes.
The popup happens because we have to map tilt to select, as RPCS3 does not have guitar hero controller passthru YET.
macOS requires manually mapping your inputs the first time you open the following games and emulators. Once you’ve mapped them, the inputs will automatically work moving forward.Make sure that you’ve followed the instructions in the Tuning and Calibration sectionLet’s get the V3 Adapter working on those games and emulators!
Clone Hero (GUITAR)
1
Open Clone Hero.
2
Press the SPACE BAR on your keyboard to open the controls/binds menu.
3
If you haven’t already, plug in your V3 Adapter with instrument attached. You will see the V3 Adapter appear here:
4
If you are playing on with a guitar, you may need to calibrate tilt and/or whammy. Click the Calibrate button.
You will be taken to this menu:
Axis 0 tends to pertain to whammy while Axis 1 is usually for tilt. Click Calibrate and follow the directions. Once you’ve calibrate, click Done.
5
On the right side of the main binds menu, there are blank spaces for each input. Click on the inputs that apply to your instrument and follow the setup instructions. Once you’ve bound all applicable inputs, click Done at the top left of the screen.
6
Once binds are set, jump into a song and test out your inputs!
7
YARG
1
Plug in your V3 Adapter + instrument
2
Open the YARC Launcher, then open YARG
3
Once the game is open, head to the Profiles section
4
Create a new profile if you don’t already have one, then click “Connect” on that newly made profile. It will ask you to pick a device.
5
If you are using an instrument aside from a guitar, change the “Game Mode”
6
Click the Edit Profile and Binds button, then click on the Binds button at the top of the screen.
7
Go through each applicable input and create a new bind for each one, setting up the buttons as you go! Some instruments might not need this, so do as needed.
8
Once you have the binds set up, you’re ready to play!
Dolphin
1
Open Dolphin
2
Click the Controllers button in the tool bar
3
In the “Wii Remotes” section, click the Configure button next to Wii Remote 1
4
At the top left of the window that popped up, change the device to the V3 Adapter
5
Then, on the right side of the window, there is an Extensions section. By default it will show that there is “None” extension. Change that to Guitar, then click Configure Extension. You will be taken to the Extension menu.
6
In the Extension menu, begin mapping each input. If you have trouble mapping them from the Extensions menu, right click the input. A popup will appear that shows all possible inputs. Press down the input you’re trying to bind a few times while looking through the inputs. Once you’ve found the one you want, click Insert Input, then click OK.
7
Once you’ve bound all the inputs you need, click Close and test a game!If you run into any input issues, check that multiple buttons are not bound to the same input.
PCSX2
1
Plug your V3 Adapter + guitar into the computer
2
Open PCSX2
3
Click the Settings menu in the Mac menu bar, then click “Controllers”
4
Click “Controller Port 1” on the left side of the window
5
If it isn’t already set to guitar, change the preset on the left side to guitar
6
Hold SHIFT then click an input. Add the binding manually.
We do this process manually to ensure that each one is correctly set.
7
Once you have each input bound, close the menu and start the game!
My V3 Adapter is not appearing in the RCM Programming Tool
There are multiple potential reasons for this occurring.
The instrument plugged into your V3 Adapter may be causing the adapter to go into a different mode. Unplug the instrument, then plug the V3 adapter back into your computer.
Faulty USB cable or USB port. Using the same cable, try a different port, then switch the cable.
Lastly, you may just need to hard reset the device. Holding the reset button (small button inside pinhole on the front of the V3 Adapter) while plugging the adapter in will put it into recovery mode, which will make a drive named “RPI-RP2” appear on your computer.
Windows Defender is stopping the RCM Programming Tool from opening
The RCM Programming Tool will sometimes get blocked by Windows Defender or other antivirus software. This is a false positive. The pop-up tends to occur due to the tool being freshly made (we have to recompile the programmer every time we update revisions).You can just click Run Anyway.
The RCM Programming Tool isn't opening on macOS
If you are experiencing the following pop-up, macOS is detecting the RCM Programming Tool as a false-positive for being malware.
To fix this, open your System Settings/System Preferences.Then navigate to the Privacy and Security tab in the left side menu.Once you’ve entered this tab, scroll down to the Security section, then you’ll see that the programming tool was blocked. Click Open Anyway. It will ask you to either enter your password or input Touch ID.
Once you’ve completed this, the programmer will open. However it is only for this revision.Say you had 10.7.11 instead of 10.7.10, you would need to do this process again.
The RCM Programming Tool is not seeing my device on Linux
If the RCM Programming Tool is not seeing your device, it is likely due to a permissions issue in Linux.You will need the following file:
Navigate to /etc/udev/rules.d/, then drop 68-RCM.rules into the folder.Once you’ve done that, open the RCM Programming Tool. Your device should appear now! If not, try unplugging and plugging back in.
My V3 Adapter is not working in BetterGH3 on SteamOS/Bazzite/Linux